
Whether you’re sewing, crafting, wrapping a gift, or finishing a machine embroidery project, bows are a crowning touch! Here’s the Kimberbell way of tying the perfect bow. All you need is ribbon, 30 seconds of your time, and the fingers of a friend.
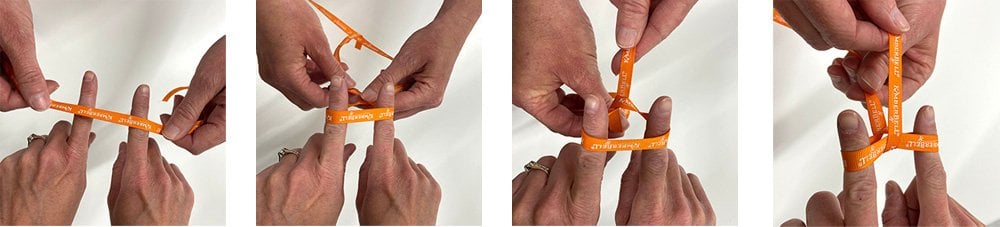
1. Face your friend and ask them to point their two index fingers toward you, with the fingers approximately 2” apart.
2. Wrap the ribbon (print side up!) across the top of your friend’s fingers.
3. Cross the ribbon and twist at the bottom so it’s perpendicular to the ribbon above (just like when tying ribbon around a gift).
4. Pull the end of the ribbon (the side closest to your friend) over the top loop. The printed side of the ribbon should be facing up.
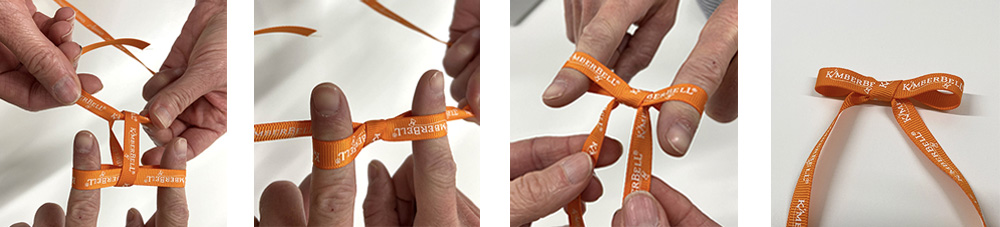
5. Tie the ribbon on the bottom (the end closest to you).
6. Pull tightly, making sure the printed side of the ribbon is facing up on both ends. Slip the loops from your friend’s fingers and adjust as needed.
7. With scissors, trim the ends of the ribbon at an angle to prevent fraying.
Ta-da! You now have a beautiful bow. But how much ribbon will you need? When determining ribbon length, a good rule of thumb is the wider the ribbon, the longer the length. For example, for a ribbon ⅜ to ½” wide, you might cut a 12” length. For ⅝” to 1” wide ribbon, you’d probably want to go around 15-20” long (and so on).
Tying with Tulle
I often tie birthday, shower, and Christmas presents with tulle. Here are some slight adjustments to the directions above for making a full and pretty tulle bow:
- Cut a long length of tulle and find the middle.
- Face a friend and ask them to point their two index fingers toward you (fingers around 4” apart).
- Center the middle of the tulle over your friend’s fingers.
- Wrap the tulle around the top of your friend’s fingers, cross at the bottom, and bring back to the top. Repeat multiple times. (Wrap and cross above, wrap and cross below, wrap and cross above, wrap and cross below…)
- From the bottom, twist so the tulle is perpendicular to the loops you made above (just like when tying ribbon around a gift).
- Pull the end of the tulle (the side closest to your friend) over the top.
- Tie the tulle on the bottom (the end closest to you)
- Pull tight, remove the tulle from your friend’s fingers, and fan out the sides of the bow!
By following these simple tips from Kimberbell, you’re sure to be an expert bow-maker in no time!

Watch this video to see Lauri (from Tuesday Tips with Kimberbell) demonstrate this method of tying bows!